
It's been a little while, but Steve Hughes is back for his latest blog in the Excel at Excel series. In this blog, he will discuss adding calculated measures when working with SSAS in Excel.
Adding Calculated Measures to the Excel 2013 Workbook
If you have worked with SQL Server Analysis Services in the past you already know what calculated measures are. More importantly, you know how to update the MDXScript without requiring a cube refresh.
A calculated measure uses existing measures and MDX to provide additional, shared calculations in a cube. However, there are many times that the ability to create a calculated measure in Excel would be great. In Excel 2013, this is now possible.
Once you have connected to a cube using a pivot table, you can add calculated measures using the OLAP Tools menu on the ANALYZE tab.
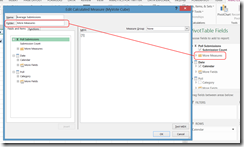
When you select the MDX Calculated Measure item, it will open an MDX dialog designer in which you can create a measure. (MDX Calculated Members are will be in the next tip.)
Before we create our measure, let’s talk about the ancillary parts such as the name, folder and measure group. You will want to give your measure a name. It needs to be unique within the work you are doing and unique from other measures in the cube or you will get an error.
The folder and measure group are really optional. It really depends on how you want display the new measures in the Excel Fields window. I would recommend that folders are used when large volumes of measures are being used. It is a great way to organize the measures into consumable, related groups for your users.
When you designate the measure group, the measure and folder will be put in the same group as the measure group. This is appropriate when the measure is related exclusively to the measure group, conceptually if not technically. I usually will only do this if all of the measures come from the same measure group (technically related) or if the user understands that the measure “should” be a part of the measure group even if it is dependent on measures outside of the current measure group (conceptually).
Next, you create the measure. The Fields and Items tab contains the measures and dimensions available while the Functions tab has the MDX functions you can use. Use the Test MDX button to verify syntax prior to saving the measure.
The really nice part is that this measure is now contained within the workbook. It does not get published back to the server. However, if the measure becomes popular, you can use the MDX from this measure to create a new measure on the server. It will be business verified before being published. By using Excel to create calculated measures, you also prevent a glut of single use measures from being created on the server.
Finally, to manage created measures, use the Manage Calculations option on the OLAP Tools menu. It will open a dialog with all of the calculated measures and calculated members created with this data connection in the workbook. In my scenario, I used the MyVote Cube connection to create the measure. Basically, the pivot table is associated with a connection and that is the defacto filter for this list.
Use Excel to test MDX simply. This will allow you to create measures, verify data, then deploy working code. It is a great addition to the product.
Don't forget to check out the Pragmatic Works' on-demand learning platform for more insightful content and training sessions on Power BI, Power Apps, Power Automate, Copilot Studio, Fabric, Azure and other Microsoft applications. Be sure to subscribe to the Pragmatic Works YouTube channel to stay up-to-date on the latest tips and tricks, along with fresh content every week.
It's also incredibly easy to get started with your 7-day free trial. No credit card required. Just click below and you'll be on your way.
Sign-up now and get instant access
ABOUT THE AUTHOR
Free Community Plan
On-demand learning
Most Recent
private training


-1.png)
Leave a comment